Hvordan importeres og eksporteres kategorier i Outlook?
Som du ved, kan du oprette mange farvekategorier i Outlook. Derudover kan du også eksportere alle dine tilpassede kategorier og dele dem med dine kolleger eller importere til ny computer osv. Denne artikel er arrangeret til at lede dig gennem eksport og import af kategorier i Microsoft Outlook.
Eksportér kategorier fra Microsoft Outlook
Importer kategorier til Microsoft Outlook
- Automatiser e-mail med Auto CC / BCC, Automatisk videresendelse ved regler; sende Auto svar (Ikke til stede) uden at kræve en udvekslingsserver...
- Få påmindelser som BCC Advarsel når du svarer til alle, mens du er på BCC-listen, og Påmind, når du mangler vedhæftede filer for glemte vedhæftede filer...
- Forbedre e-mail-effektiviteten med Svar (alle) med vedhæftede filer, Tilføj automatisk hilsen eller dato og tid til signatur eller emne, Besvar flere e-mails...
- Strømline e-mail med Genkald e-mails, Vedhæftningsværktøjer (Komprimer alle, Gem alt automatisk...), Fjern duplikaterog Hurtig rapport...
 Eksportér kategorier fra Microsoft Outlook
Alle farvekategorier, inklusive standardkategorier og tilpassede kategorier, kan eksporteres fra Microsoft Outlook. Du kan gøre det som følger:
Trin 1: Opret en ny note:
- I Outlook 2007 skal du klikke på File (Felt) > Ny > Bemærk.
- I Outlook 2010 skal du klikke på Nye varer > Flere elementer > Bemærk.

Trin 2: Skriv en tekst i den nye notadialog. I dette tilfælde indtaster vi teksten til Kategorier.
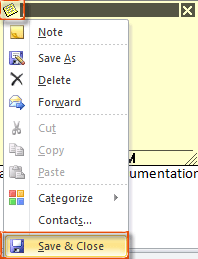
Trin 3: Klik på knappen i øverste venstre hjørne i notevinduet, og klik derefter på Gem og luk i Outlook 2010 (eller Luk i Outlook 2007).
Trin 4: Skift til notevisningen ved at klikke på Bemærk ikonet i navigationsruden.
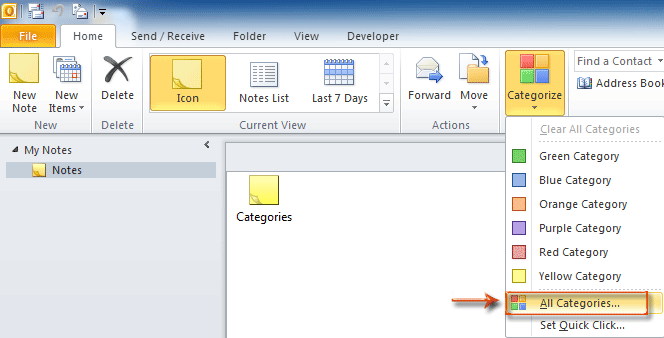
Trin 5: Klik på den note, du oprettede før, og klik derefter på Kategoriser > alle kategorier i Tags gruppe på Home fanen i Outlook 2010.
I Outlook 2007 skal du klikke på Kategoriser > alle kategorier i værktøjslinjen.
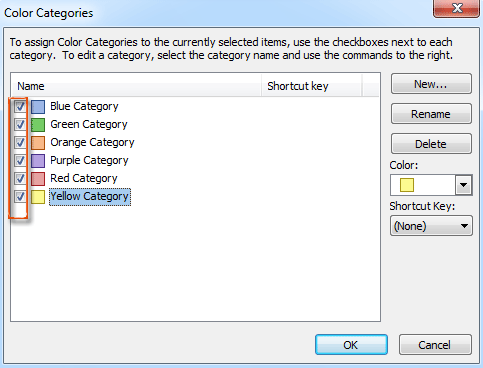
Trin 6: Kontroller de farvekategorier, du vil eksportere senere, i dialogboksen Farvekategorier, og klik derefter på OK .
Trin 7: Træk og flyt noten til en mappe i Windows for at gemme den. Denne note gemmes som en .msg-fil.
 Importer kategorier til Microsoft Outlook
Inden du importerer farvekategorier til din Microsoft Outlook, kræves en .msg-fil med en note med farvekategorier.
Trin 1: Skift til notevisningen ved at klikke på Bemærk i navigationsruden.
Trin 2: Træk .msg-filen med note med farvekategorier til Microsoft Outlook.
Trin 3: Skift til postvisningen ved at klikke på Post i navigationsruden.
Trin 3: Højreklik på et e-mail-kontonavn i navigationsruden, og vælg Egenskaber for datafiler i højreklikmenuen.
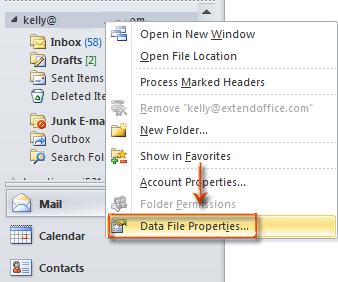
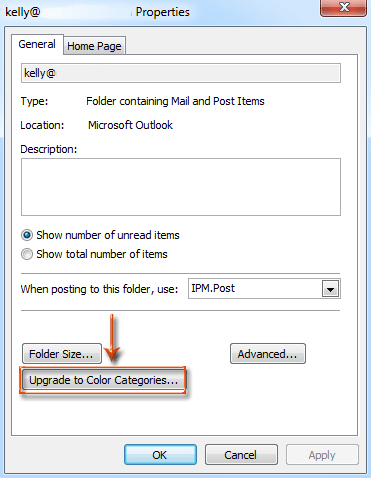
Trin 4: Klik på i dialogboksen Mappeegenskaber Opgrader til farvekategorier .
Trin 5: En advarselsdialogboks kommer ud, og klik bare på Ja .

Derefter kopieres alle farvekategorier, der er tilføjet i .msg-filen, og importeres til Microsoft Outlook.
Trin 6: Klik på OK knappen i dialogboksen Mappeegenskaber.
Bemærk:
1. Hvis din e-mail-kontotype er SMTP, som ikke understøtter noten, f.eks. Gmail, er dette trick ikke tilgængeligt.
2. Du kan kun opdatere farvekategorierne, hvis den indsatte note og din e-mail-mappe hører til den samme datafil som pst eller ost.
Bedste kontorproduktivitetsværktøjer
Kutools til Outlook - Over 100 kraftfulde funktioner til at superlade din Outlook
🤖 AI Mail Assistant: Øjeblikkelige pro-e-mails med AI-magi – et klik for geniale svar, perfekt tone, flersproget beherskelse. Forvandl e-mailing ubesværet! ...
📧 Email Automation: Ikke til stede (tilgængelig til POP og IMAP) / Planlæg Send e-mails / Auto CC/BCC efter regler ved afsendelse af e-mail / Automatisk videresendelse (avancerede regler) / Tilføj automatisk hilsen / Opdel automatisk e-mails med flere modtagere i individuelle meddelelser ...
📨 Email Management: Genkald nemt e-mails / Bloker svindel-e-mails af emner og andre / Slet duplikerede e-mails / Avanceret søgning / Konsolider mapper ...
📁 Vedhæftede filer Pro: Batch Gem / Batch adskilles / Batch komprimere / Automatisk gem / Automatisk afmontering / Automatisk komprimering ...
🌟 Interface Magic: 😊 Flere smukke og seje emojis / Boost din Outlook-produktivitet med fanebaserede visninger / Minimer Outlook i stedet for at lukke ...
👍 Wonders med et enkelt klik: Besvar alle med indgående vedhæftede filer / Anti-phishing e-mails / 🕘Vis afsenderens tidszone ...
👩🏼🤝👩🏻 Kontakter og kalender: Batch Tilføj kontakter fra udvalgte e-mails / Opdel en kontaktgruppe til individuelle grupper / Fjern fødselsdagspåmindelser ...
Over 100 Features Afvent din udforskning! Klik her for at finde mere.

