Hvordan udskrives alle vedhæftede filer i en / flere e-mails i Outlook?
Som du ved, udskriver det kun e-mail-indholdet, f.eks. Header, body, når du klikker på File (Felt) > Print i Microsoft Outlook, men udskriv ikke vedhæftede filer. Her viser vi dig, hvordan du nemt udskriver alle vedhæftede filer i en valgt e-mail i Microsoft Outlook.
- Udskriv alle vedhæftede filer i en e-mail-besked en efter en
- Batchudskriv alle vedhæftede filer i en e-mail-besked
- Batchudskriv alle vedhæftede filer og billeder i flere udvalgte e-mails
- Batchudskriv alle vedhæftede filer i flere udvalgte e-mails undtagen billeder i brødteksten
Udskriv alle vedhæftede filer i en e-mail-besked en efter en
Microsoft Outlook giver os Hurtig udskrivning funktion, som kan hjælpe dig med at udskrive vedhæftede filer i en e-mail-besked en efter en.
1. Vælg den e-mail-meddelelse, hvis vedhæftede filer du vil udskrive senere.
2. Klik på en vedhæftet fil i denne e-mail.

3. Klik på Hurtig udskrivning knappen i handlinger gruppe på Vedhæftede filer fane.
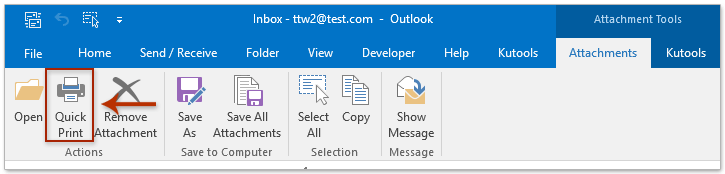
Bemærk: Vedhæftningsværktøjer aktiveres ikke, før du klikker på vedhæftede filer i e-mails.
4. En dialogboks til åbning af mailvedhæftning kommer ud, og klik venligst på Åbne .
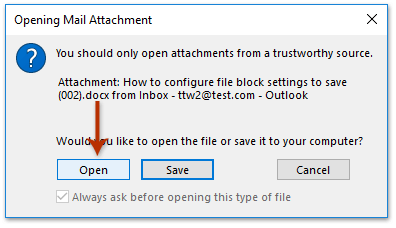
Bemærk, at dette trin åbner den valgte vedhæftede fil og udskriver den valgte vedhæftede fil på samme tid.
Hvis du vil udskrive andre vedhæftede filer i denne e-mail, skal du gentage trin 2 til trin 4.
Gem / eksporter hurtigt alle vedhæftede filer fra flere e-mails i Outlook
Normalt kan vi gemme vedhæftede filer fra en e-mail ved at aktivere Vedhæftningsværktøjer og anvende Gem alle vedhæftede filer funktion i Outlook. Men hvad nu hvis du gemmer vedhæftede filer fra flere e-mails eller fra hele mailmappen i Outlook? Prøv Kutools til Outlook Gem alle (Vedhæftede filer) -funktion.
Batchudskriv alle vedhæftede filer i en e-mail-besked
Hvis der er mange vedhæftede filer i den ene e-mail, vil det være tidskrævende at udskrive dem én efter én. Og den følgende metode vil lede dig gennem batchudskrivning af alle vedhæftede filer i en valgt e-mail-meddelelse.
1. Vælg den e-mail-meddelelse, hvis vedhæftede filer du vil udskrive senere.
2. I Outlook 2010 eller nyere versioner skal du klikke på File (Felt) > Print > Udskriftsindstillinger. Se følgende skærmbillede:
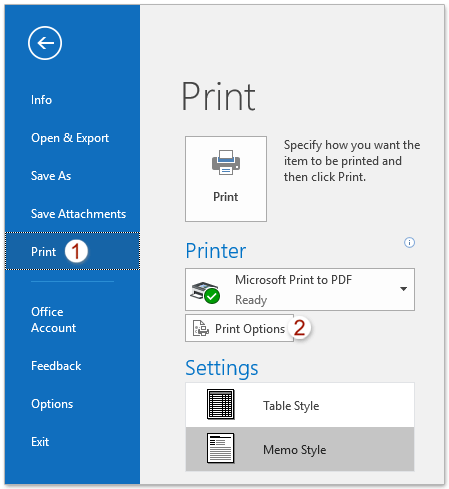
3. I dialogboksen Udskriv skal du kontrollere Udskriv vedhæftede filer. Vedhæftede filer udskrives kun til standardprinteren valgmulighed i Printindstillinger sektion.
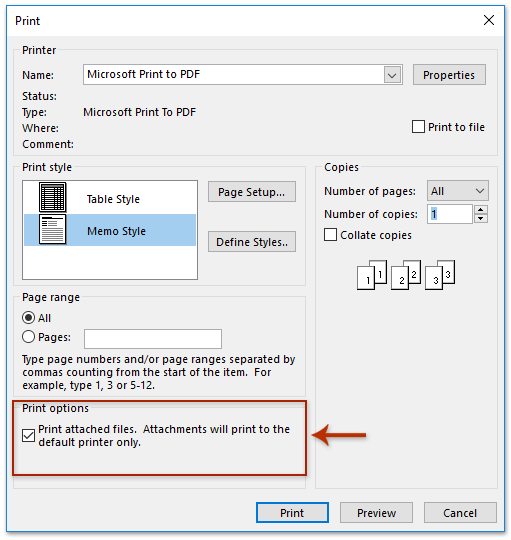
4. Klik på Print .
5. Klik i dialogboksen Åbning af vedhæftet fil ved at åbne Åbne knappen for at gå videre. (Bemærk: Denne dialogboks vises for hver vedhæftet fil separat.)
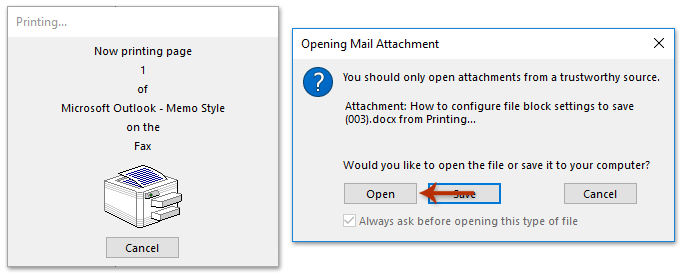
Nu vil alle vedhæftede filer i denne valgte e-mail blive udskrevet på én gang.
Batchudskriv alle vedhæftede filer og billeder i flere udvalgte e-mails
For at udskrive alle vedhæftede filer i flere e-mails samt alle billederne i meddelelsesteksten i Outlook, skal du følge nedenstående trin for at anvende en VBA-kode.
1. Hold på mailinglisten Ctrl or Flytte taster for at vælge flere e-mails, hvis vedhæftede filer du vil udskrive.
2. Trykke andre + F11 nøgler sammen for at åbne vinduet Microsoft Visual Basic til applikationer.
3. Klik på i vinduet Microsoft Visual Basic for Applications Værktøjer > Referencer. Og tjek derefter Microsoft Scripting Runtime mulighed som vist nedenfor. Når du er færdig, klik OK.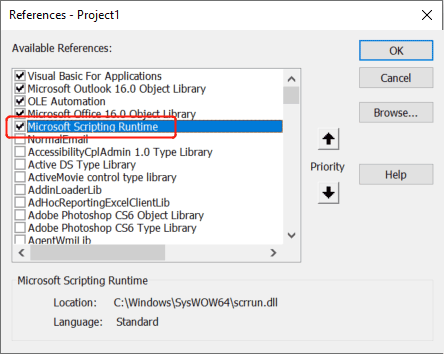
4. Klik indsatte > Moduler, og indsæt derefter under VBA-kode i det nye modulvindue.
VBA: Udskriv alle vedhæftede filer i flere Outlook-e-mails
Sub PrintAllAttachmentsInMultipleMails()
  'Update by ExtendOffice 2022/08/03
  Dim xShellApp As Object
  Dim xFSO As Scripting.FileSystemObject
  Dim xItem As Object
  Dim xTempFldPath, xFilePath As String
  Dim xSelItems As Outlook.Selection
  Dim xMailItem As Outlook.MailItem
  Dim xAttachments As Outlook.Attachments
  Dim xAttachment As Outlook.Attachment
  Dim xFile As File
  On Error Resume Next
  Set xFSO = New Scripting.FileSystemObject
  xTempFldPath = xFSO.GetSpecialFolder(2).Path & "\Attachments " & Format(Now, "yyyymmddhhmmss") 'xFSO.GetSpecialFolder(2) For saving temporary files
  If xFSO.FolderExists(xTemfldpath) = False Then 'create temporary folder
    xFSO.CreateFolder (xTempFldPath)
  End If
  Set xSelItems = Outlook.ActiveExplorer.Selection
  Set xShellApp = CreateObject("Shell.Application")
  For Each xItem In xSelItems
    If xItem.Class = OlObjectClass.olMail Then
      Set xMailItem = xItem
      Set xAttachments = xMailItem.Attachments
      For Each xAttachment In xAttachments
        xFilePath = xTempFldPath & "\" & xAttachment.FileName
        xAttachment.SaveAsFile (xFilePath)
      Next
    End If
  Next
  For Each xFile In xFSO.GetFolder(xTempFldPath).Files
    VBA.DoEvents
    Call xShellApp.ShellExecute(xFile.Path, "", "", "print", 0)
  Next
  Set xSelItems = Nothing
  Set xShellApp = Nothing
  Set xFSO = Nothing
End Sub
5. Trykke F5 eller klik på Kør knappen for at køre denne VBA-kode. Nu vil du se, at alle vedhæftede filer i de valgte e-mails og billederne i teksten er printet ud.
Bemærk:
- Hvert billede vil vise en pop-up dialogboks for at bede dig om bekræftelse af udskrivning. Mens andre typer filer vil blive udskrevet direkte.
- Hvis der er billeder i en e-mail-signatur, vil de også vise pop op-dialogbokse.
- Hvis du får Makroerne i dette projekt er deaktiveret fejl, tjek venligst denne vejledning: Sådan aktiveres og deaktiveres makroer i Outlook?
Batchudskriv alle vedhæftede filer i flere udvalgte e-mails undtagen billeder i brødteksten
For kun at udskrive vedhæftede filer i flere e-mails, men billederne i meddelelsesteksten i Outlook, skal du følge nedenstående trin for at anvende en VBA-kode.
1. Hold på mailinglisten Ctrl or Flytte taster for at vælge flere e-mails, hvis vedhæftede filer du vil udskrive.
2. Trykke andre + F11 nøgler sammen for at åbne vinduet Microsoft Visual Basic til applikationer.
3. Klik på i vinduet Microsoft Visual Basic for Applications Værktøjer > Referencer. Og tjek derefter Microsoft Scripting Runtime mulighed som vist nedenfor. Når du er færdig, klik OK.
4. Klik indsatte > Moduler, og indsæt derefter under VBA-kode i det nye modulvindue.
VBA: Udskriv alle vedhæftede filer i flere Outlook-e-mails
Sub PrintAllAttachmentsInMultipleMails()
  'Update by ExtendOffice 2022/08/05
  Dim xShellApp As Object
  Dim xFSO As Scripting.FileSystemObject
  Dim xItem As Object
  Dim xTempFldPath, xFilePath As String
  Dim xSelItems As Outlook.Selection
  Dim xMailItem As Outlook.MailItem
  Dim xAttachments As Outlook.Attachments
  Dim xAttachment As Outlook.Attachment
  Dim xFile As File
  On Error Resume Next
  Set xFSO = New Scripting.FileSystemObject
  xTempFldPath = xFSO.GetSpecialFolder(2).Path & "\Attachments " & Format(Now, "yyyymmddhhmmss") 'xFSO.GetSpecialFolder(2) For saving temporary files
  If xFSO.FolderExists(xTemfldpath) = False Then 'create temporary folder
    xFSO.CreateFolder (xTempFldPath)
  End If
  Set xSelItems = Outlook.ActiveExplorer.Selection
  Set xShellApp = CreateObject("Shell.Application")
  For Each xItem In xSelItems
    If xItem.Class = OlObjectClass.olMail Then
      Set xMailItem = xItem
      Set xAttachments = xMailItem.Attachments
      For Each xAttachment In xAttachments
        If IsEmbeddedAttachment(xAttachment) = False Then
          xFilePath = xTempFldPath & "\" & xAttachment.FileName
          xAttachment.SaveAsFile (xFilePath)
          Debug.Print xFilePath
        End If
      Next
    End If
  Next
  For Each xFile In xFSO.GetFolder(xTempFldPath).Files
    VBA.DoEvents
    Call xShellApp.ShellExecute(xFile.Path, "", "", "print", 0)
  Next
  Set xSelItems = Nothing
  Set xShellApp = Nothing
  Set xFSO = Nothing
End Sub

Function IsEmbeddedAttachment(Attach As Attachment)
Dim xItem As MailItem
Dim xCid As String
Dim xID As String
Dim xHtml As String
On Error Resume Next
IsEmbeddedAttachment = False
Set xItem = Attach.Parent
If xItem.BodyFormat <> olFormatHTML Then Exit Function
xCid = ""
xCid = Attach.PropertyAccessor.GetProperty("http://schemas.microsoft.com/mapi/proptag/0x3712001F")
If xCid <> "" Then
    xHtml = xItem.HTMLBody
    xID = "cid:" & xCid
    If InStr(xHtml, xID) > 0 Then
        IsEmbeddedAttachment = True
    End If
End If
End Function
5. Trykke F5 eller klik på Kør knappen for at køre denne VBA-kode. Nu vil du se, at alle vedhæftede filer i de valgte e-mails er printet ud.
Bemærk:
- Hvert vedhæftede billede vil vise en pop-up dialogboks for at bede dig om bekræftelse af udskrivning. Mens andre typer filer vil blive udskrevet direkte.
- Billeder i meddelelsesteksten udskrives ikke.
- Hvis du får Makroerne i dette projekt er deaktiveret fejl, tjek venligst denne vejledning: Sådan aktiveres og deaktiveres makroer i Outlook?
Demo: udskriv en eller alle vedhæftede filer i en Outlook-e-mail
Tip: I denne video, Kutools fanen tilføjes af Kutools til Outlook. Hvis du har brug for det, skal du klikke link. at have en 60-dages gratis prøveperiode uden begrænsning!
Bedste kontorproduktivitetsværktøjer
Kutools til Outlook - Over 100 kraftfulde funktioner til at superlade din Outlook
🤖 AI Mail Assistant: Øjeblikkelige pro-e-mails med AI-magi – et klik for geniale svar, perfekt tone, flersproget beherskelse. Forvandl e-mailing ubesværet! ...
📧 Email Automation: Ikke til stede (tilgængelig til POP og IMAP) / Planlæg Send e-mails / Auto CC/BCC efter regler ved afsendelse af e-mail / Automatisk videresendelse (avancerede regler) / Tilføj automatisk hilsen / Opdel automatisk e-mails med flere modtagere i individuelle meddelelser ...
📨 Email Management: Genkald nemt e-mails / Bloker svindel-e-mails af emner og andre / Slet duplikerede e-mails / Avanceret søgning / Konsolider mapper ...
📁 Vedhæftede filer Pro: Batch Gem / Batch adskilles / Batch komprimere / Automatisk gem / Automatisk afmontering / Automatisk komprimering ...
🌟 Interface Magic: 😊 Flere smukke og seje emojis / Boost din Outlook-produktivitet med fanebaserede visninger / Minimer Outlook i stedet for at lukke ...
👍 Wonders med et enkelt klik: Besvar alle med indgående vedhæftede filer / Anti-phishing e-mails / 🕘Vis afsenderens tidszone ...
👩🏼🤝👩🏻 Kontakter og kalender: Batch Tilføj kontakter fra udvalgte e-mails / Opdel en kontaktgruppe til individuelle grupper / Fjern fødselsdagspåmindelser ...
Over 100 Features Afvent din udforskning! Klik her for at finde mere.

