Hvordan ændres aftalefarver i Outlook?
Nogle gange vil du måske fremhæve dine aftaler og gøre dem nemme at finde i Microsoft Outlook. Den almindelige måde er at ændre aftalernes farve. Her vil jeg introducere to tricks til nemt at ændre aftalefarver i Microsoft Outlook.
Skift farve til en aftale i Outlook
Skift automatisk farve til flere aftaler i Outlook
- Automatiser e-mail med Auto CC / BCC, Automatisk videresendelse ved regler; sende Auto svar (Ikke til stede) uden at kræve en udvekslingsserver...
- Få påmindelser som BCC Advarsel når du svarer til alle, mens du er på BCC-listen, og Påmind, når du mangler vedhæftede filer for glemte vedhæftede filer...
- Forbedre e-mail-effektiviteten med Svar (alle) med vedhæftede filer, Tilføj automatisk hilsen eller dato og tid til signatur eller emne, Besvar flere e-mails...
- Strømline e-mail med Genkald e-mails, Vedhæftningsværktøjer (Komprimer alle, Gem alt automatisk...), Fjern duplikaterog Hurtig rapport...
 Skift farve til en aftale i Outlook
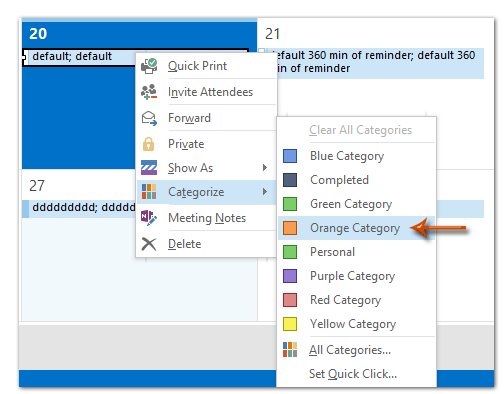
Det er ret nemt at ændre en aftales farve i Microsoft Outlook, og du kan nemt få det gjort ved at højreklikke på aftalen og vælge Boligtype fra rullelisten, og angiv en farve fra undermenuen. Se skærmbillede nedenfor:
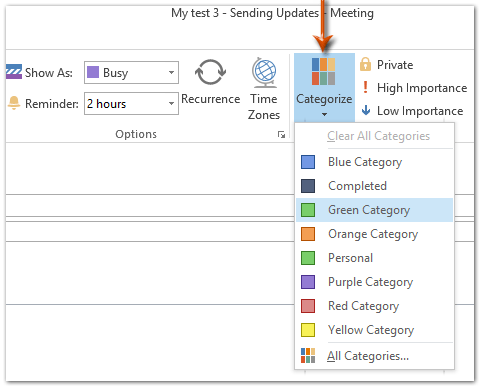
Når du sammensætter en aftale, kan du også ændre farven ved at klikke på Kategoriser knappen på Udnævnelser fanen, og angiv en kategorifarve fra rullelisten.
Skift automatisk farve til flere aftaler i Outlook
I dette afsnit vil jeg guide dig til at ændre kalendermappens visningsindstillinger og foretage betinget formatering, så Microsoft Outlook automatisk nemt kan ændre farve til flere aftaler.
Trin 1: Skift til kalendervisningen, og åbn mappen Kalender, hvor du vil skifte farve til flere aftaler.
Trin 2: Klik på Se indstillinger knappen på Specifikation fane.
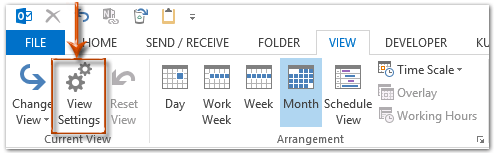
Bemærk: I Outlook 2007 kan du klikke på Specifikation > Nuværende visning > Tilpas aktuel visning.
Trin 3: Klik på i dialogboksen, der åbnes Betinget formatering knap (eller Automatisk formatering knap).
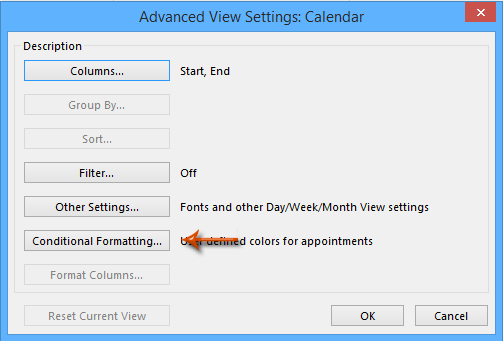
Trin 4: Nu kommer du ind i dialogboksen Betinget formatering, og:
(1) Klik på Tilføj knap;
(2) Indtast et navn til den nye regel i Navn boks;
(3) Klik på Farve boks, og angiv en farve fra rullelisten, se skærmbillede nedenfor;
(4) Klik på Betingelse .

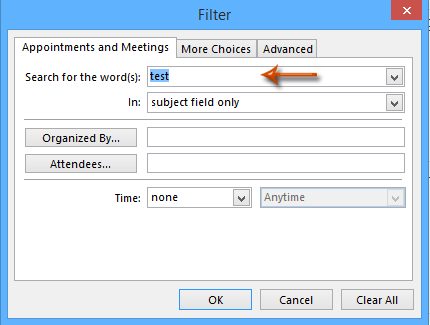
Trin 5: Angiv dine filterkriterier i dialogboksen, der dukker op.
For eksempel ændrer du farve for alle aftaler med teksten “prøve”Kun i deres emnefelter, skal du bare indtaste teksten til“prøve" ind i Søg efter ordene boks.
Trin 6: Klik på alle OK for at lukke alle dialogbokse.
Derefter ændrer Microsoft Outlook farven på alle aftaler, der opfylder filterkriterierne, du angav i trin 5 automatisk.
Bedste kontorproduktivitetsværktøjer
Kutools til Outlook - Over 100 kraftfulde funktioner til at superlade din Outlook
🤖 AI Mail Assistant: Øjeblikkelige pro-e-mails med AI-magi – et klik for geniale svar, perfekt tone, flersproget beherskelse. Forvandl e-mailing ubesværet! ...
📧 Email Automation: Ikke til stede (tilgængelig til POP og IMAP) / Planlæg Send e-mails / Auto CC/BCC efter regler ved afsendelse af e-mail / Automatisk videresendelse (avancerede regler) / Tilføj automatisk hilsen / Opdel automatisk e-mails med flere modtagere i individuelle meddelelser ...
📨 Email Management: Genkald nemt e-mails / Bloker svindel-e-mails af emner og andre / Slet duplikerede e-mails / Avanceret søgning / Konsolider mapper ...
📁 Vedhæftede filer Pro: Batch Gem / Batch adskilles / Batch komprimere / Automatisk gem / Automatisk afmontering / Automatisk komprimering ...
🌟 Interface Magic: 😊 Flere smukke og seje emojis / Boost din Outlook-produktivitet med fanebaserede visninger / Minimer Outlook i stedet for at lukke ...
👍 Wonders med et enkelt klik: Besvar alle med indgående vedhæftede filer / Anti-phishing e-mails / 🕘Vis afsenderens tidszone ...
👩🏼🤝👩🏻 Kontakter og kalender: Batch Tilføj kontakter fra udvalgte e-mails / Opdel en kontaktgruppe til individuelle grupper / Fjern fødselsdagspåmindelser ...
Over 100 Features Afvent din udforskning! Klik her for at finde mere.

