Hvordan deler jeg kontaktgruppe (distributionsliste) i Outlook?
Lad os sige, at du vil dele dine kontaktgrupper med dine kolleger, hvordan kunne du dele dem? Og hvad nu hvis du gemmer kontaktgrupper, der sendes til dig i Outlook? Denne artikel taler om deling af kontaktgrupper i Outlook.
- Del dine kontaktgrupper (distributionslister) i Outlook med andre brugere
- Del / gem kontaktgruppe (distributionsliste) sendt til dig i Outlook
Del dine kontaktgrupper (distributionslister) i Outlook med andre brugere
Hvis du vil dele dine kontaktgrupper i Outlook med andre, kan du gøre som følger:
1. i Post se, opret en ny e-mail ved at klikke Home > ny email.
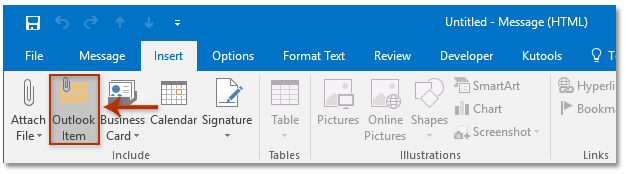
2. Klik i de nye meddelelsesvinduer indsatte > Outlook-vare. Se skærmbillede:
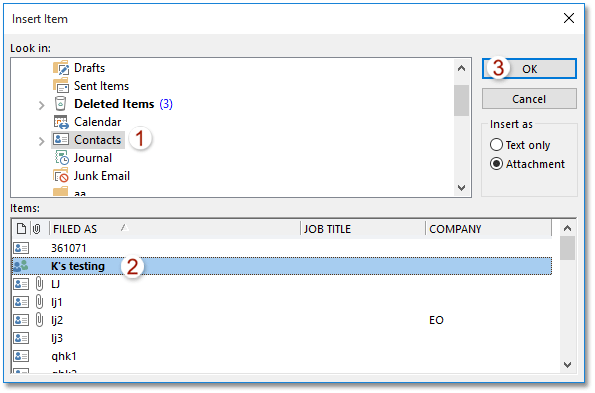
3. I den åbne dialogboks Indsæt element:
(1) Gå til Kig ind Klik for at vælge Kontakt os mappe, der indeholder de kontaktgrupper, du vil dele;
(2) Gå til Varer boks, og klik for at vælge en eller flere kontaktgrupper, du vil dele;
(3) Klik på OK knap. Se skærmbillede:
4. Nu tilføjes de valgte kontaktgrupper som vedhæftede filer i den nye e-mail. Skriv venligst e-mailen og send den.
Del / gem kontaktgruppe (distributionsliste) sendt til dig i Outlook
Hvis du modtog e-mails med delte kontaktgrupper, kan du nemt kopiere og gemme kontaktgrupperne i mappen Kontakter i Outlook.
1. i Post visning, klik for at åbne e-mailen, der indeholder vedhæftede filer i kontaktgruppen i Læsepanel.
2. Vælg kontaktgrupperne i Læsepanel, træk dem til ikonet People ![]() or
or ![]() i navigationsruden, og slip derefter musen, indtil markøren ændres til
i navigationsruden, og slip derefter musen, indtil markøren ændres til![]() . Se skærmbillede:
. Se skærmbillede:
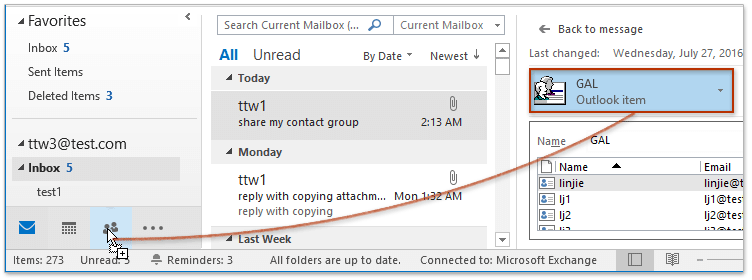
Indtil videre er de angivne kontaktgrupper, som andre delte med dig, blevet kopieret og gemt i din kontaktmappe.
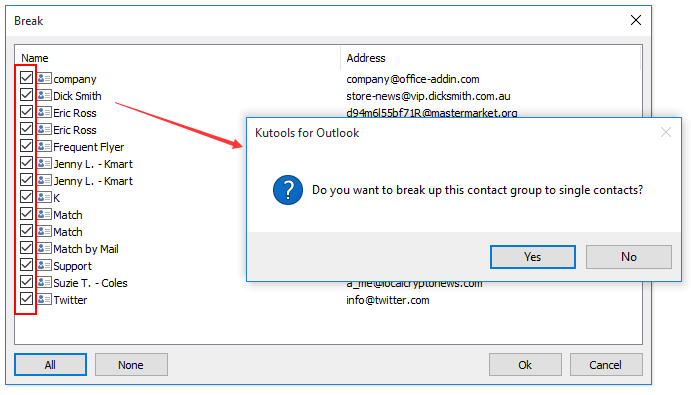
Batch gemmer hvert medlem af en kontaktgruppe (distributionsliste) som individuel kontakt i Outlook
Med Kutools til Outlook Bryde kontaktgruppe funktion, kan du hurtigt gemme alle eller flere valgte medlemmer til individuelle kontakter i Outlook.
Relaterede artikler
Tilføj kontakter fra distributionslisten (kontaktgruppe) i Outlook
Tilføj flere e-mails afsendere til distributionslisten (kontaktgruppe) i Outlook
Udskriv distributionsliste (kontaktgruppe) på en side i Outlook
Bedste kontorproduktivitetsværktøjer
Kutools til Outlook - Over 100 kraftfulde funktioner til at superlade din Outlook
🤖 AI Mail Assistant: Øjeblikkelige pro-e-mails med AI-magi – et klik for geniale svar, perfekt tone, flersproget beherskelse. Forvandl e-mailing ubesværet! ...
📧 Email Automation: Ikke til stede (tilgængelig til POP og IMAP) / Planlæg Send e-mails / Auto CC/BCC efter regler ved afsendelse af e-mail / Automatisk videresendelse (avancerede regler) / Tilføj automatisk hilsen / Opdel automatisk e-mails med flere modtagere i individuelle meddelelser ...
📨 Email Management: Genkald nemt e-mails / Bloker svindel-e-mails af emner og andre / Slet duplikerede e-mails / Avanceret søgning / Konsolider mapper ...
📁 Vedhæftede filer Pro: Batch Gem / Batch adskilles / Batch komprimere / Automatisk gem / Automatisk afmontering / Automatisk komprimering ...
🌟 Interface Magic: 😊 Flere smukke og seje emojis / Boost din Outlook-produktivitet med fanebaserede visninger / Minimer Outlook i stedet for at lukke ...
👍 Wonders med et enkelt klik: Besvar alle med indgående vedhæftede filer / Anti-phishing e-mails / 🕘Vis afsenderens tidszone ...
👩🏼🤝👩🏻 Kontakter og kalender: Batch Tilføj kontakter fra udvalgte e-mails / Opdel en kontaktgruppe til individuelle grupper / Fjern fødselsdagspåmindelser ...
Over 100 Features Afvent din udforskning! Klik her for at finde mere.

