Outlook: skift mappe, hvor sendte varer er gemt
Som du ved, gemmes sendte e-mail-meddelelser automatisk i mappen Sendte poster. Men her arrangerer vi nogle tricks om, hvordan du ændrer standardmappen med sendt vare og gemmer sendte e-mail-meddelelser i alternative mapper i Microsoft Outlook nemt.
Skift den mappe, der sendes emner gemmes i, når du komponerer
Skift mappe, hvor alle sendte genstande gemmes automatisk
- Automatiser e-mail med Auto CC / BCC, Automatisk videresendelse ved regler; sende Auto svar (Ikke til stede) uden at kræve en udvekslingsserver...
- Få påmindelser som BCC Advarsel når du svarer til alle, mens du er på BCC-listen, og Påmind, når du mangler vedhæftede filer for glemte vedhæftede filer...
- Forbedre e-mail-effektiviteten med Svar (alle) med vedhæftede filer, Tilføj automatisk hilsen eller dato og tid til signatur eller emne, Besvar flere e-mails...
- Strømline e-mail med Genkald e-mails, Vedhæftningsværktøjer (Komprimer alle, Gem alt automatisk...), Fjern duplikaterog Hurtig rapport...
 Skift den mappe, der sendes emner gemmes i, når du komponerer
Når du komponerer en e-mail-besked, kan du definere en alternativ mappe, hvor denne afsendende e-mail gemmes i efter afsendelse.
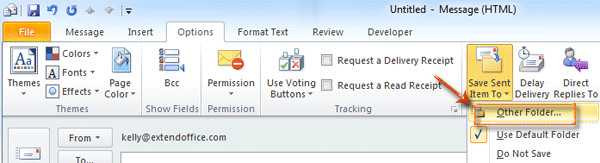
Trin 1: Klik på Gem afsendt vare til > Anden mappe i Flere indstillinger gruppe på Indstillinger fanen i meddelelsesvinduet.
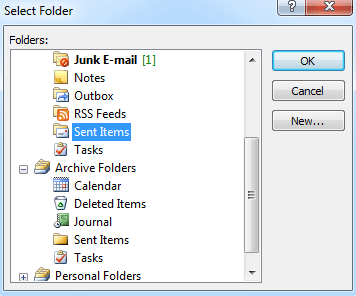
Trin 2: Vælg og fremhæv en mappe i dialogboksen Vælg mappe mapper: boks og klik på OK .
Når du har sendt denne e-mail-meddelelse, gemmes dens kopi automatisk i den mappe, du valgte i trin 2.
Skift mappe, hvor alle sendte genstande gemmes automatisk
I nogle tilfælde vil du muligvis ændre den standardmappe, der sendes, og lade alle sendte e-mail-meddelelser automatisk gemmes i en bestemt mappe. Vi vil guide dig til at indse det ved at oprette en regel i Outlook.
Inden du opretter en regel, skal du skifte til Mail-visningen ved at klikke på Post i navigationsruden.
Trin 1: Åbn dialogboksen Regler og alarmer:
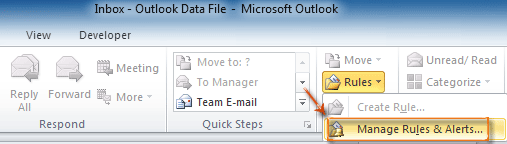
- I Outlook 2010 og 2013 skal du klikke på Regler > Administrer regler og advarsler i Flyt gruppe på Home fane.
- I Outlook 2007 skal du klikke på Værktøjer > Regler og advarsler.
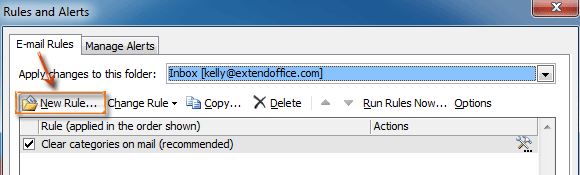
Trin 2: Klik på i dialogboksen Regler og alarmer Ny regel knappen på E-mail-regler fane.
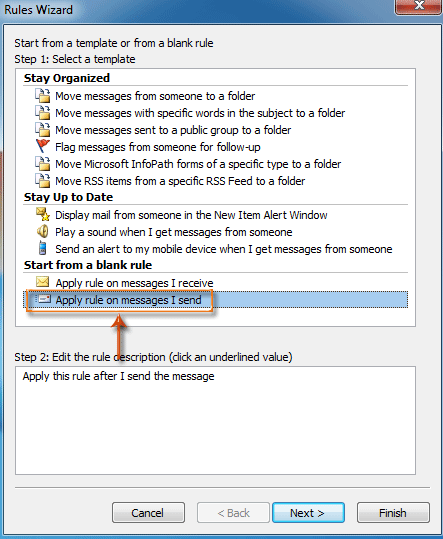
Trin 3: Vælg og fremhæv i dialogboksen Guiden Regler Anvend regel på meddelelser, jeg sender i Start fra o blank regel sektion, og klik på knappen Næste .
Trin 4: I dialogboksen Guiden ny regler,
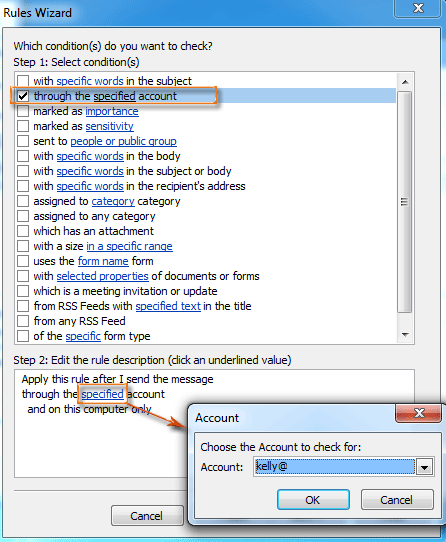
- Tjek gennem den angivne konto valgmulighed i Trin 1: Vælg betingelser sektion.
- Klik på knappen specificeret i Trin 2: Rediger regelbeskrivelsen sektion.
- I dialogboksen popping up Account skal du vælge en konto i Konto: boks og klik OK .
- Klik på knappen Næste .
Trin 5: I dialogboksen Guiden ny regler,
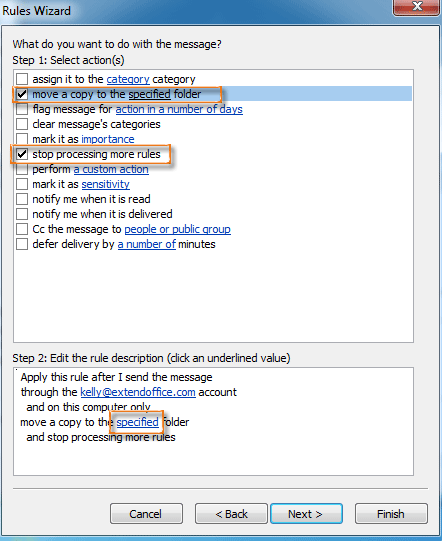
- Tjek flytte en kopi til den angivne mappe mulighed og stop med at behandle flere regler valgmulighed i Trin 1: Vælg handling (er) sektion.
- Klik på knappen specificeret i Trin 2: Rediger regelbeskrivelsen sektion.
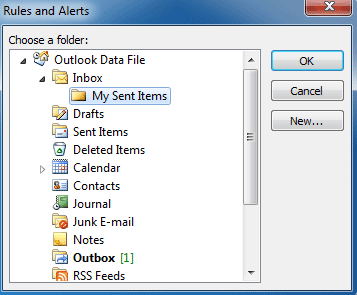
- I dialogboksen Regler og alarmer skal du vælge en mappe og klikke på OK .
- Klik på knappen Næste .
Trin 6: Fortsæt med at klikke på Næste knapper og Finish i de følgende dialogbokse.
Fra nu af gemmes alle sendte e-mail-meddelelser automatisk i den mappe, du konfigurerede i trin 5.
Bedste kontorproduktivitetsværktøjer
Kutools til Outlook - Over 100 kraftfulde funktioner til at superlade din Outlook
🤖 AI Mail Assistant: Øjeblikkelige pro-e-mails med AI-magi – et klik for geniale svar, perfekt tone, flersproget beherskelse. Forvandl e-mailing ubesværet! ...
📧 Email Automation: Ikke til stede (tilgængelig til POP og IMAP) / Planlæg Send e-mails / Auto CC/BCC efter regler ved afsendelse af e-mail / Automatisk videresendelse (avancerede regler) / Tilføj automatisk hilsen / Opdel automatisk e-mails med flere modtagere i individuelle meddelelser ...
📨 Email Management: Genkald nemt e-mails / Bloker svindel-e-mails af emner og andre / Slet duplikerede e-mails / Avanceret søgning / Konsolider mapper ...
📁 Vedhæftede filer Pro: Batch Gem / Batch adskilles / Batch komprimere / Automatisk gem / Automatisk afmontering / Automatisk komprimering ...
🌟 Interface Magic: 😊 Flere smukke og seje emojis / Boost din Outlook-produktivitet med fanebaserede visninger / Minimer Outlook i stedet for at lukke ...
👍 Wonders med et enkelt klik: Besvar alle med indgående vedhæftede filer / Anti-phishing e-mails / 🕘Vis afsenderens tidszone ...
👩🏼🤝👩🏻 Kontakter og kalender: Batch Tilføj kontakter fra udvalgte e-mails / Opdel en kontaktgruppe til individuelle grupper / Fjern fødselsdagspåmindelser ...
Over 100 Features Afvent din udforskning! Klik her for at finde mere.

